|
Your
Default Email Account
You may access your email through the web browser, instead of POP3
mail. To access your web bases email (once your DNS settes):

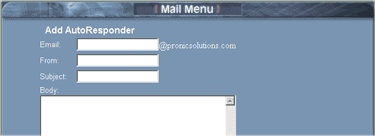
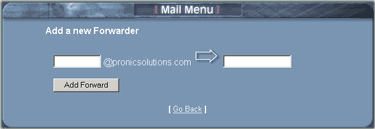
Type the username you want in the Email box and the password you choose for this account in the Password box. Click Create and your new account will be activated. In order to receive mail sent to this address, you must set up the new account in the program you use for email. For example, if you access your email through your browser, you need to add this account to your browser's email program. Please refer to the Configuring Email Software menu of our Web Hosting Support section for instructions on how to configure different email clients. To Remove an Email Account: Click on Delete to the right of the account that you would like to remove. Autoresponders Autoresponders will automatically send an email for you. Autoresponders are typically used to send information in response to a visitor's request. For example, visitor's could click on a link that says "Click Here to Receive Special Report." When the visitor clicks on the link, their email program will open a new message addressed to your autoresponder. When they send the email, your autoresponder will reply by automatically sending your Special Report to the visitor. This feature is also useful when you know you will not be reading or responding to incoming email massages for a period of time. To create an autoresponder you must first create an email account. To add an autoresponder: Click on Autoresponders Click on Add AutoResponders. The following screen will appear:  In the Email box, type the email name you choose for your Autoresponder. This will be the email address that visitor's click on to access the Autoresponder. If you think you may set up more than one Autoresponder, it is helpful to choose a username that is descriptive. For example, reportx. The mailto link you will place on your site will be reportx@yourdomain.com. Fill in the From and Subject boxes, then place the information you want to send in the Body area. You can't use html tags in an Autoresponder. They will only accept plain text. Click Create and your new Autoresponder will be activated. To delete an autoresponder: Click on Delete to the right of the autoresponder that you would like to delete. Email Forwarding: You can have any or all email addressed to your domain account forwarded to an outside email account or to a different email address within your domain. To add an email forwarder: Click on Forwarders Click on Add Forwarder. The following screen will appear:  Type the account name of the address you want mail forwarded from in the first window, and the complete email address you want the mail forwarded to in the second window. Click on Add Forward and your new Forwarder will be activated. Remember, you can forward mail to any address, inside or outside of your domain. For example: youremail@aol.com or yourmail@yourdomain.com. Be careful when forwarding email accounts inside your domain. You might inadvertently create an indefinite loop that can cause all email accounts to stop working on your domain. NOTE: You do not have to create an email account to setup a forwarder. For example, if you want to forward all email messages going to john@yourdomain.com, do not create a an email account for john@yourdomain.com. When you setup the forwarder the server will know what to do. If there is an email account created for any forwarder, that forwarder will not function. To delete an email forwarder: Click on Delete to the right of the forwarder that you would like to delete. Blocking Email Messages You can block unwanted email according to email address, subject, header, recipient, or even phrases inside the body of the message. To block unwanted email: Click on Block an Email Click on Add Filter. The following screen will appear:  Use the drop down menus to choose what you want blocked. For example, you might want to filter out pornographic email messages. You could choose Subject, Body or Any Header from the first drop down menu, and Contains from the second drop down menu. Then type a phrase or word that frequently appears in the header or body of email you receive that promotes pornographic content, For example "girls." To block email from a specific source, just choose From in the first drop down menu, then Equals from the second menu. Type in the person's email address in the box and click Activate. To remove an email block/filter: Click on Delete to the right of the filter that you would like to delete. About Email Aliases You never have to create email aliases. Your default email account is setup as a "Catch All" account, meaning that any email coming to anything@yourdomain.com is delivered to your default account. |